
My obsession with Pinterest has meant I have seen hundreds of amazing
sewing projects created by sewing half triangles from quilts, cushions,
bags the list goes on. Naturally I had that moment of “well it can’t be
too hard!” and although it is easy I learnt the hard way!
The first few attempts I had sewing half triangles a few years ago I individually cut
each triangle. Which took FOREVER! Not only that but lining
everything up became harder. Meaning creating a block square by square
seemed an awful lot of hard work and effort.
But when you make them the easy way its amazing the patterns you can make quickly with just a simple triangle. At the moment I'm loving this star pattern but you can really have fun playing around with patterns and prints. Anyway I'll stop waffling now and lets get going!


So here it is: How to sew half triangles (the easy way!)
Firstly cut your fabric into squares. Now the size you cut them will
all depend on how large you want them for the particular project you are
doing. This technique works no matter the size you choose. For this
demonstration I cut my fabric into four inch squares.

Place two squares together, so that they are right sides together (or
print on print). At this point I like to press the squares as it helps
keep everything flat and lined up more easily.
Remember to press and NOT iron. If you run your iron over it several times instead of pressing, it can stretch the fabric.

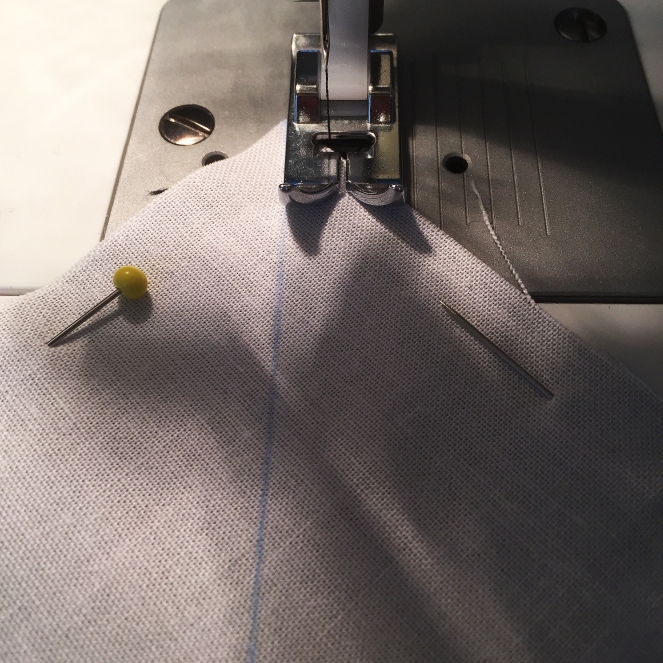
Pin the squares together making sure everything stays lined up.
Draw a diagonal line using a ruler from one corner to the other using
a fabric pen or pencil. Here I used a dressmakers pencil by Hemline in
blue.

Now it’s time to sew! You need to sew using a straight stitch on both
sides of the line, making sure you sew the same distance from the line.
So you should end up with something like this….

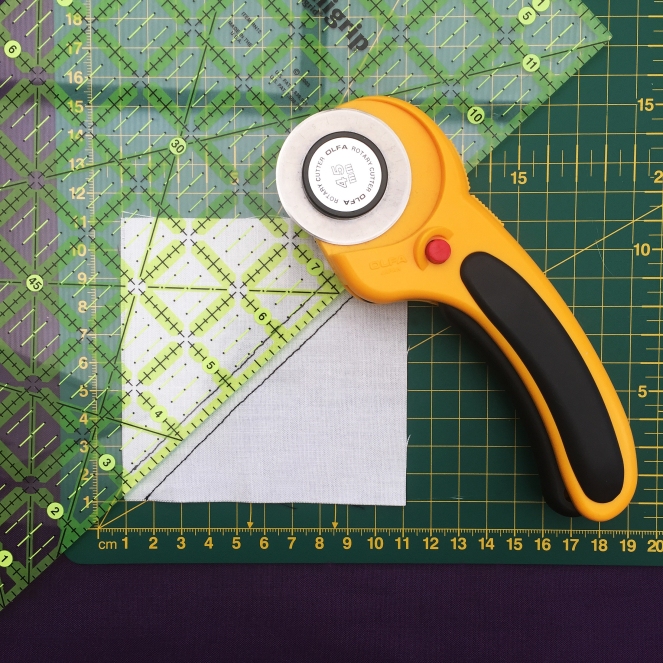
Now remove the pins and cut along the pencil or pen mark that you
drew. I find using a rotary cutter and quilting ruler the easiest way to
do this.

Open each piece of fabric and press the seams to one side.
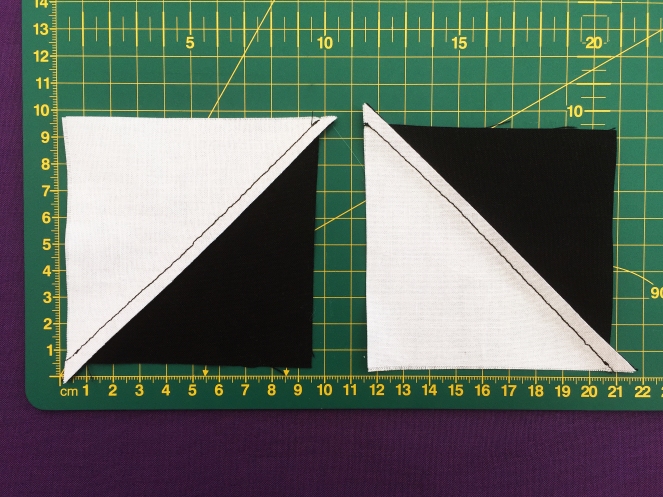
Cut the tips that over hang the square and that is it! Two squares made
in one go, far easier than cutting the triangles out individually!

From using this technique you can create all sorts of patterns and
designs. When you pick a design you would make all the individual
squares before laying them out in your desired pattern. Once arranged
sew each square together row by row.
I hope you all found this little tutorial useful. I would love to
hear any feedback you may have or answer any questions. If there is
anything you would like to see a tutorial on please let me know in the
comments below.

Throughout the year we always put a few decorations up and create a little spread for events that occur. So not just the usual holidays (Christmas, Easter and Halloween) but everything in between from the Olympics, Eurovision, anything requiring a Union Jack! and of course Wimbledon. Because why not! It’s all I’ve ever known and it’s nice to get into the spirit of things, not to mention it's the perfect excuse to get crafty.
So of course that means cupcakes!
I made one batch of chocolate cupcakes using the ultimate chocolate cupcakes recipe which you can find here.
Firstly I decorated six cakes by pipping whipped cream using a Wilton large drop flower tip. Cored and slicing strawberries in half, I placed a single half on each cake.
Originally I came across someone who had made chocolate tennis rackets. I searched high and low for the mould they used but to no avail. The few I did come across were all from America and I could not justify the shipping costs just for a chocolate mould!
So instead I managed to find these hand made edible sugar decorations, that are finished with edible lustre on eBay. I was nervous about how well they would get to me being delicate but they turned out brilliantly.

The remaining six cakes were topped with buttercream with a few drops of apple green food colouring mixed in. I've recently found the food colour gels to be better than the liquid food colouring's, so definitely give them a go
Using a Wilton No.233 tip to create the look of grass, this tip is so effective! I covered as much as I could even doing a second layer on some parts to make it look fuller. Next I used Renshaw Ready to Roll Icing in yellow, rolling out thinly and cutting out discs. The white lines were piped on using Dr. Oetker White Designer Icing.
And Voila!
I’m so pleased with the way they turned out.


Makes: 14 Cupcakes
Time: Roughly 25 -30 Minutes
Ingredients
- 4tbsp - Milk
- 40g or 1oz - Cocoa Powder
- 3 - Free Range Large Eggs
- 175g or 6oz - Unsalted Butter (softened)
- 165g or 6oz - Caster Sugar
- 115g or 4oz - Self Raising White Flour
- 1tsp - Baking Powder
Method
- Pre-heat oven to Gas Mark 6.
- Sift cocoa powder into a bowl.
- Heat the milk gently in a pan until its warmed through. Be careful not to fully boil it!
- Add the milk to the cocoa powder and mix until you get a smooth thick paste. Tip: If the mixture hasn't quite come together just heat through a little more milk and add to the mixture.
- Add all the other ingredients and mix together. It's best to use an electric hand whisk for this. Tip: Once mixed I often give it a quick stir (scrapping the sides of the bowl) with a spatula to make sure there's no cocoa paste stuck to the bottom of the bowl. If necessary give the mixture a quick 10 second electric whisk to make sure everything is combined.
- Place cupcake cases into a cupcake tin and divide the mixture evenly. I usually make around 14 cakes from this mixture.
- Place in the center of the oven and bake for 12-15 minutes until well risen and spongy to the touch. Tip: to be sure they are cooked use a skewer in the middle of the cupcake and it should come out clean.
- Leave to cool before adding any icing or decorations.
And that's it. Enjoy!

I thought it would be a good idea to show my sewing machine set up, so you can see what I use.
I dabble in all sorts of crafts but for some reason sewing seemed to have passed me by, having never really done textiles at school. So five years ago I decided to take the plunge and buy my first sewing machine, it was a tad scary at the time but I haven’t looked back!
So here it is, my machine is a Singer Simple 3232. I’m not going to lie, the fact it had lilac on it did draw me to it (typical girly way of choosing I know!).
It’s very easy to use and cost me around £150. There are some great machines that are cheaper than this one (around £80-£100), but at the time I decided to spend a little extra and go for a machine that I could “grow” into, rather than something too basic.
This is the perfect sewing machine for beginners. It does everything that I need it to – straight stitch, zig zag, button holes and comes with a zipper foot – and that is really all you need to get going. Singer is a trusted brand and I loved that I could purchase the extra feet and accessories in my local craft shop.
It may not be all singing and dancing, but for anyone just starting out with sewing there is no need to spend a fortune. Keep it simple and honestly you cannot go wrong.
I've never had any problems with this machine and I'm sure one day I'll upgrade to something more snazzy!
xx


Social Icons