
It's hard to believe that The Great British Bake off has been in our lives since the summer of 2010! Like the majority of people I've been a fan since the start and the love for Bake Off is still going strong!
There's been a huge rise in subscription boxes in the last few years, and so when it was announced at the end of 2020 the Bake Off Box was happening it was fair to say I was super excited! However, with so many subscription box services out there you really have to pick and choose and weigh up which ones are worth it.
With it being Bake off I thought I would at least try the first box, completely swayed by the fact you receive a gorgeous duck egg cake stand in the first box! The first bake is the signature chocolate cake you see in the opening credits, yes the one with the one missing raspberry on the edge!

So what comes in the box?
Each box comes with:
- A piece of bake ware - First box included a cake stand made from bamboo
- A postcard with those famous illustrations of the bake by Tom Hovey
- A recipe card with full instructions and step by step photos
- A card with the fresh ingredients you will need to buy as extra
- All of the dry ingredients for the bake
The good and bad:
Firstly the packaging was beautiful, just look at the colour! Everything was ECO friendly, recyclable and there is a nice touch where they include where all the ingredients come from. The recipe card also includes the full ingredients list and measurements. I love this as it means you're able to make the cake again in the future, which isn't always the case with some kits. The cake stand is beautiful and of good quality although I'm not sure you could put a heavy, tiered or big cake on it.
Included is all the dry ingredients which are basic household items, meaning there are still numerous extras you have to buy, the most expensive ingredients at that! I'm a little on the fence about this one. Mostly because its understandable having to buy ingredients like cream fresh, but if other subscription boxes such as Hello Fresh and Gousto manage to send fresh ingredients, it makes me wonder why the Bake Off Box can't? For this bake you have to buy cream, raspberries and there's a few other extras needed. Making the cake a tad pricey to make when you've already spent £20 on the box. I guess this will differ month to month depending on what that months bake is. Compared to other baking kits I've seen I can't decide whether the price is worth it. Or whether the recipes could simply be found in the various Bake Off Books, but then I guess it's not as fun as receiving the box each month!

How much does it cost?
There are 3 subscription options: A monthly rolling subscription costing £19.99, this is the one I chose. Or you can buy 3 month or 6 month subscriptions. There's no discounts for subscribing for multiple months at a time and all prices include delivery. I like that you aren't completely tied into the subscription if you choose the monthly rolling, you can cancel and rejoin. Choosing the bakes you'd like to do as they tend to post on social media what the next box will be. It's hard to judge value for money without knowing how much the bake ware would cost on its own but I'm glad the box price includes delivery. Always a bonus!
The Bake Itself
Now I've waffled on too long, its time to bake! It was great fun to make and I think any skill level could make it, even as an activity to do with the kids. There's a great feeling of nostalgia, I was definitely humming the Great British Bake Off theme a few times!
The cake itself is quite dense but moist. I found that it had a good balance of being chocolatey but it's not too rich that its sickly! The instruction leaflet is very good, easy to follow with great photos to help.
I went for a smooth chocolate ganache finish rather than the textured finish they suggested. All I will say here is that I left my ganache a lot longer than the instructions stated, around an hour to let it thicken up. I was a little worried putting the ganache on that it would look messy and run all over the place! However I persevered and kept adding and smoothing the sides of the cake. I'm so happy with how it turned out! I love how the raspberries set it off, simple but so pretty!

And there you have it!!
I enjoyed this and have decided to try the next few boxes to see what they are like. The next box being Mini Banana and Walnut Loaf Cakes, something I've never made before. If you're interested in this subscription find below the link to the Bake Off Box website.
www.bakeoffbox.co.uk

I spend a lot of time sewing and baking but papercraft is where it all started for me. Every now and again I come across a project that unearths that love for card and paper and this is one of them!
After scrolling through Cricut Design Space I found this beautiful framed layered Rose art by Anna Griffin and just had to give it ago.
So, with a project in mind, I raided Hobbycraft for supplies:
I picked up a 10 x 10 inch Shadow frame ( I prefer these to the box frames). A range of 12x12 card in pinks, greens and glitter card. I love the card that has a slight texture to it. I opted for silver glitter for the background instead of the champagne the design suggests.
I also used the greens from this Hobbycraft Bright Colour Spectrum Paper Pad (A4 24 Pack). These packs are amazing and great value, if you're lucky you can find them on offer. They have various packs in different colourways and effects, including foil, glitter and even marble so well worth stocking up on.

Cricut Design space makes it super easy! It lays everything out for you and takes you through every step of the project. Once all the layers have been cut simply layer them together in the right order and stick together using sticky foam squares. The foam squares create the depth which makes this project pop!

Once all stuck together, place it in the frame and its done! This would make a beautiful present for someone especially for Mother's Day or it would be great decor for Valentines Day.
This project is the first one I've done of this kind. I'm blown away by how easy Cricut makes it. To make it from scratch and papercut this kind of project with a craft knife would have taken hours and hours! You mostly see vinyl being the main material used when looking at Cricut projects on YouTube and blogs. But Cricut is a game changer for papercrafts! I'm definitely going to make a few more of these!


- Mosaic Tiles
- Glue
- Grout
- Grout Scraper
- Plain tray
You get a good amount of all the supplies, I was a little worried about the amount of grout but it was enough to complete the project. My only slight dismay with the contents was the tray being plain. The picture on the packaging shows it as white, which is a bit misleading! So, you do need to get yourself some acrylic paint and give the tray a couple of coats before you can start. This isn't a big thing of course, but personally, I wish more blanks came in white to save time!

Now I've never grouted before, and it was the part I was most worried about! But it was so easy. I followed the instructions but did find I needed to add more water than it stated to get the grout to a toothpaste consistency. From here it's just a case of filling the gaps between the tiles with the grout. The scraper tool is very good although I found using a clean lollipop stick better for doing the edges and slightly fiddly areas.

After around 15 minutes using a slightly damp cloth clean up the tiles, the grout will come off easily and reveal the beautiful mosaic underneath.
And there you have it! I love it and will definitely try more mosaic projects now I know how easy it is. I would recommend this kit if you want to give mosaic a go. The box doesn't look like much but I was pleasantly surprised how good it was. You can create some beautiful pieces for the home using mosaic. Go and try it!

It wouldn't be Easter in our house without making these Easter Biscuits. They are easy to make and you'll no doubt make multiple batches! I find these are a nice treat if you fancy something that isn't chocolate. Yes, you can have too much chocolate sometimes! They are also fab to add to an Easter Hamper if you plan on making a gift for someone.
Find the recipe below!
Ingredients
- 4oz - Soft Butter
- 4oz - Caster Sugar
- 1 - Free Range Large Egg
- 8oz - Plain Flour
- ½ tsp - Cinnamon
- 2-3oz - Currants
- Pinch of Salt
- Milk to Glaze
Method
- Preheat the oven to gas mark 3 or Fan -325ºF. Line a baking tray at the same time with some baking paper.
- Either by hand or in a freestanding mixer, cream together the butter and sugar until light and fluffy.
- Add the flour, cinnamon, currants and salt.
- Now add the egg and bind together to make a stiff dough.
- Knead lightly until you have a nice ball of dough.
- Cover with cling film and chill for 30 minutes.
- Sprinkle a little flour on your surface to prevent the dough from sticking and roll-out the dough. Cut out your biscuits with a cookie cutter and place them on your baking tray.
- Glaze with some milk and bake until just golden brown.
Enjoy!

I can't remember a year our family hasn't made a batch of these Christmas butter biscuits! Super simple to make and a nice basic biscuit to nibble on that isn't rich and fun for kids to make as well.
You can use any cookie cutters you like but my family have always stuck with this classic look. I picked up this great set of reversible cutters by Tala a little while ago in a baking shop, but you can find them in many places including Amazon for around £5.50. The scallop edges are so pretty!
To create the holly impression on top I used a small metal holly leaf cutter and a piping nozzle for the berries. Just be careful not to press all the way through the dough when making the impression.
For the colour, I used Rainbow Dust Pro gel. Its concentrated meaning you only need a small amount to get a bold colour. These food gels are much better than liquids which my mum and I used to use for years. Liquid food colour had a tendency to fade when the biscuits were baking however these gels really hold their colour.
Of course, you can create any design and use any colours you like. This technique is easy but very effective. Scroll down for the recipe and method...

The Recipe:
Makes: Roughly 12 depending on the size and shape you go for, I often double the mixture to make bigger batches.
Ingredients
- 75g or 3oz - Butter
- 50g or 2oz - Icing Sugar
- 1- Egg Yolk
- 175g or 6oz - Plain Flour
- A Pinch of Salt
To Decorate
- 2 -Egg Yolks
- Red and Green Food Gels
Method
- In a large bowl, beat the butter, sugar together until pale and fluffy. Tip: If you like you can also add the finely grated rind of 1 small lemon for added flavour.
- Beat in the egg yolk and then sift in the flour and the salt. Knead together to form a smooth dough. Wrap in cling film and chill for 30 mins.
- Pre-heat the oven to Gas Mark 5.
- On a lightly floured surface roll out the dough to roughly the thickness of a pound coin. Tip: Use a rolling pin that has guide rings to ensure the dough is evenly rolled out.
- Now cut out your biscuits and transfer to baking trays lined with baking paper. Repeat until you've used all the dough.
- Make the impression on the tops using the holly cutter and piping nozzle for the berries. It's not necessary but sometimes it helps to chill the biscuits for 10 minutes next.
- Meanwhile, prepare the colouring by putting each egg yolk into a small cup or dish. Mix a colour into each egg yolk.
- Using a small clean paintbrush, carefully paint the colours onto the biscuits.
- Bake for 8-10 minutes, or until they begin to colour around the edges.
Tip: The original recipe for these state 10-12 minutes but I find biscuits bake and can burn quickly! So depending on how hot your oven is, check on them around the 7-minute mark, and then keep an eye on them from there. - Leave to cool on the baking trays before transferring to a wire rack to cool completely.
And that's it. Enjoy!

Fully dusted in icing sugar this spruced-up vanilla cake recipe is definitely a show stopper! As impressive as it looks it's more down to the tin used than any masterful baking skill. The recipe is from Nigellas Christmas book and you can also find it in on her website. I’ve made a number of recipes from this book over the years and I’d highly recommend it. This cake is made with natural yogurt making it nice and light. Perfect for when you’ve already overindulged!
The tin used is expensive there's no denying it. It's the pine forest bundt tin from Nordic Ware, they create the most amazing high-quality baking tins that last for years. You can find a number of them on places like Amazon and even eBay. Although pricey they are worth the splurge for special occasions. Of course, you can just use a normal 2.5-litre bundt tin.

So without further ado here's the recipe:
Makes: about 12 slices
Ingredients
- 225g - Soft Butter (plus more for greasing)
- 300g - Caster Sugar
- 6 - Free Range Large Eggs
- 350g - Plain Flour
- ½ tsp - Bicarbonate of Soda
- 250g - Plain fat-free yoghurt
- 4 tsp - Vanilla Extract
- 2 tbsp - Icing Sugar
To turn this into Spruced-Up Spice Cake halve the vanilla and add 2 teaspoons each of ground cinnamon and ginger and a half teaspoon of ground cloves.
Method
- Preheat the oven to 180°C/160°C Fan/gas mark 4/350ºF and put a baking sheet in at the same time. Butter or oil your large, regular or fir-tree shaped bundt tin (2.5 litres capacity / 2½ quart capacity) very, very thoroughly. Tip: I prefer to melt a little butter and use a pastry brush to ensure all crevices are greased.
- Either by hand or in a freestanding mixer, cream together the butter and sugar until light and fluffy.
- Add the eggs one at a time, whisking each one in with a tablespoon of flour.
- Fold in the rest of the flour, and add the bicarbonate of soda, the yogurt and vanilla extract. Don't overbeat or the cake will rise too much, giving an overly-domed bottom later - though it's not the end of the world, as you can always trim it if necessary.
- Pour and spoon the mixture into your greased tin and spread about evenly.
- Place the tin on the preheated baking sheet in the oven and cook for 45–60 minutes until well risen and golden. After 45 minutes, push a skewer into the centre of the cake. If it comes out clean, the cake is cooked. Let it sit out of the oven for 15 minutes.
- Gently pull away from the edges of the cake from the tin with your fingers, then turn out the cake, hoping for the best.
- Once cool, dust with the icing sugar pushed through a small sieve, to decorate.
Enjoy!
Additional Information
FREEZE AHEAD TIP: Make, wrap and freeze the cake for up to 3 months. Thaw overnight in a cool room.

Time for a little throwback! I've been so busy the last few months that I never got around to posting about this Christmas wreath making workshop I ran. This was part of the Hobbycraft 12 makes of Christmas workshops, which allowed customers to have a go at a range of Christmas crafts during the lead up to the holidays.
Having made many wreaths in the past I was asked to run the Christmas wreath making workshop back in November and I have to say it was brilliant and a lot of fun!
These workshops include all sorts from advent making, fillable decorations, Christmas eve boxes, cracker making and many more. Hobbycraft have run these Christmas workshops for a few years now and are well worth checking out. This particular workshop cost £15, which I have to say was an absolute bargain when you take into account the number of materials they each used to build up their wreaths.
The table was filled with a whole range of floral picks, pine cones, dried oranges, floristry wire and much more.
After running through the basics of wreath making I let the groups loose to create their own wreaths in whatever way they liked.
It was so interesting to see what the favourite themes were. Many seemed to love creating a neutral modern frosty winter wonderland look. But the traditional red was also a big favourite.

Both groups absolutely loved the workshop and were thrilled with what they had created. I think they were all a little surprised at how easy it is to make something so stunning that can be used year after year. I have to say I too felt rather inspired by what they had all created afterwards!
The photos you see here are only a small sample, in total 20 wreaths were made!


Everything is done digitally, so you can design or use a preloaded project through the Cricut Design Space programme. Most Cricut machines work over wifi or Bluetooth that you link up to either your iPad, iPhone and of course your computer.
Cricut has become a game-changer for crafters. It has opened a whole new level of craft possibilities where you're only limited by your own creativity!
It's only been 18 months since I was introduced to the Cricut world and it blows my mind what people have created using their machines! I purchased a Cricut Maker a year ago and rather shockingly this was my first attempt at vinyl.
I know, I know! Everyone is vinyl mad and it's bad I've waited this long to give it a go. But here you go! My vinyl Halloween plate...
I had a good browse on Cricut Design Space and the choice is incredible! With it being my first attempt I chose this 'Happy Halloween" cat and pumpkin design, mostly because I didn't want anything too intricate. Plus I was always going to go for a cat design!
Using a cheap plate from Dunelm Mill for my base, I worked out the size I wanted and let my Cricut machine do the rest of the work. The machine is great at giving step by step instructions, letting you know the correct settings and tools to use making it a simple process. I used Cricut Glossy Black Permanent Vinyl, which is lovely to work with and looked so professional once the design was stuck to the plate.
The whole process was so easy I'm a little ashamed I haven't used vinyl before! I found I had a couple of air bubbles, but that was more down to me being awkward with my hands. With a little practice I know I'll crack it. This project took a matter of minutes to complete and I can see why everyone loves vinyl so much. Now time to put it on everything in the house!

I actually ran a workshop making these just before Halloween and it went down so well! The great thing about these designs is that you only need one cutter, and that's the fmm mix n' match face cutter. This clever cutter enables you to be able to cut 100s of different toppers, ideal! You can buy them in many places including - Amazon, Lakeland and Hobbycraft from round £5.50.

To make these cakes I used the ultimate chocolate cupcake recipe, piped with orange coloured buttercream. I used a Dr Oetker gel to colour the icing, which worked fine but wasn't as good as some of the other colour gels I've used before. It's not as concentrated so I found I had to use a fair amount to get the desired colour. For the toppers I used:
- White, Orange, Red Green and Black Renshaw Ready Roll Icing
- Wilton Candy eyes
- Orange and Black food pens
- Edible glue (and a small brush)

A good tip is to use a rolling pin that has guide rings at either end, this means you can get all of the icing the same thickness. And remember to put a little icing sugar down to stop the icing sticking to your work surface!
Also, Ready Roll Icing has a long shelf life so any leftovers can be stored in airtight containers to be used for future projects.
And that's it! These were so much fun to make and great to make with kids as well.

It was a bit of a trek from Plymouth to Manchester for one night but it was so worth it. I was so excited about this trip and jumped at the chance to go, even if it was a slight mission cramming my sewing machine into a suitcase! Once I had arrived it was made even better by the fact the group I was with were all so lovely and talented.
We met the head designer Victoria Cowley who kindly gave us a group tour of the building. Fabric envy levels were high! Everywhere you turned there were endless towers of bolts of fabric. It's safe to say I think we were all after a meter of everything there! I had seen many of the prints before, however, for some reason, it was almost like I was seeing them for the first time all over again. Being able to see the full collections together in the flesh and on such a scale made me appreciate just how beautiful the fabric they create is.
There were 11 of us in the group, all bouncing with excitement, much to the amusement of all the staff! I believe it was the first time they had ever hosted a tour and workshop. Everyone we met was so lovely, welcoming and answered any questions we had.

For those who don't know Sarah is a freelance Quilting Teacher, author, designer and demonstrator for US & UK TV Shopping Channels. She was lovely, approachable and put those that were a little nervous at ease.
For this workshop, she taught us how to make an applique cushion. Teaching us different techniques along with a fancy iron that became the talking point of the day!

Yes, even the iron we were using was amazing! It was an Oliso Smart Iron that automatically lifts and lowers with your touch. I've never seen one before but they are apparently big in America. Even the staff at Visage all came over to check it out!
All in all, it was a great day, meeting lovely people, learning new skills and of course I walked away with some fabric. A whole bolt in fact! I certainly had a few looks on the train home but I was never going to walk away empty-handed! I picked up this beauty, now I just have to work out what to make with all 15 meters of it!

See below the links to those mentioned in this post. Visage fabrics are a trade supplier but you can pick up their beautiful fabrics in your local Hobbycraft store.
The Craft Cotton co.
Hobbycraft
Sarah Payne

The recipe came free with the cakelet tin I bought from Nordic Ware, and the butterscotch recipe is from Nigella Lawson's book 'Nigella Express'.
Nordic Ware can be a little pricey but they are well worth the money, they are heavy weight tins that come in beautiful shapes that create great definition in the cake sponge. You can find them on Amazon, eBay and if you're lucky I've spotted them in shops like Tk Maxx. But of course, you can use a normal cupcake tin. They will still taste delicious regardless!
Top Tip: Use a little melted butter to lightly grease the pan with a pastry brush. You'll be able to get into all the nook and crannies of the design. I once used cake release in an intricate Christmas tin and it ruined the tin! Cake release contains a mix of flour, oil, and shortening. I found it left white clumps in the nooks that became impossible to clean afterwards! I'm wondering if I simply had a bad bottle or used too much, but I find you can never go wrong with butter.
So here is the recipe, enjoy!
 Spiced Apple Cakelet Recipe
 Time: Roughly 30 Minutes
Ingredients
- 1 ½ Cup -Plain Flour
- 1tsp -Baking Powder
- ½ tsp - Bicarbonate Soda
- ½ tsp - Ground Cinnamon
- ¼ tsp - Ground Allspice
- 1 - Free Range Large Egg
- ½ Cup -Brown Sugar
- ⅓ Cup - Softened Butter
- ½ Cup (A whole Colemans 155g jar) - Apple Sauce
- ½ Cup -Water
- Dash Ground Nutmeg
- Dash Salt
Method
- Pre-heat oven to Gas Mark 5.
- Prepare the pan with a little melted butter.
- Stir together flour, baking powder, Bi-Carb, spices and salt. Set aside.
- In a medium bowl, whisk together the softened butter and sugar
- Add the apple sauce, egg, the water and combine.
- Slowly add the flour mixture until combined.
- Pour the mixture evenly into the pan.
- Bake for 12-15 minutes or until toothpick a toothpick inserted into the centre of the cakes comes out clean.
- Let the cakes cool for 10 minutes and unmold.
Butterscotch Sauce
Ingredients
- 45g - light brown muscovado sugar
- 2 tbsp - granulated sugar
- 150g - golden syrup
- 30g- butter
- 125 ml - double cream
- a splash of vanilla extract
Method
- Melt the sugars, syrup and butter in a saucepan and boil for 5 minutes.
- Add the cream and vanilla extract, stirring together, and then take off the heat.
- Divide the sauce between two cups or small bowls, and then arrange the fruit on two saucers or on a plate, as you see fit.

Once you've mastered the basic construction the possibilities to customise them are endless! To making patchwork versions, quilted, using waterproof linings or block fabrics. They are perfect for trying new techniques without using too much fabric and ultimately building confidence.
Each pupil in the class had a little instruction booklet so they could all follow along at their own pace and take away after the workshop.
Zips can be a little daunting for beginners, but they are simple when you take it one step at a time. And there's the added option of adding tabs at each end like you see on the pouch below.

For this workshop, I pre-cut the pieces and made little kits for the pupils to choose from. If there's anything I've learned from sewing it's that the tracing and cutting is the most time-consuming part!
This meant everyone who attended was able to get straight into sewing, take their time and most importantly enjoy sewing it all together.


And here are the finished pouches! Three people attended including one guy which was lovely to see. They all did so well and the final pouches all looked great. The look of achievement when it all comes together never gets old!


Although I plan to teach a whole range of crafts, primarily I'll be teaching sewing. There are so many people out there who buy sewing machines and end up being too frightened to get them out of the box, which is such a shame!
I've always been a believer in starting basic and building up skills. So I decided the first workshop I would run would be How to Sew Bunting.
So I set the date of 18th August, opened up for bookings and was so happy to see the amount of interest. I've helped countless people set up their new sewing machines over the last 5 years and couldn't wait to start making actual projects.
I want to make it as easy for people as possible. I know from experience how frustrating it is walking away from a workshop and forgetting half of what was said! So I have made a little step by step instruction booklet and templates for people to take away for each of my workshops.

I had a group of six people and it was lovely to see everyone getting stuck in! The fabrics and colour combinations people chose were beautiful. I always love seeing the choices people make as it's all inspiration for future projects.
And perhaps best of all three young girls attended and it's great to see youngsters getting crafty and learning new skills.


After two hours we had four lots of bunting all sewn up. Everyone loved it and I can't wait for the next workshops!

Project Details
Design Size: 8x11 Inches
Material Used: DMC Charles Craft Aida Navy Blue Find Here
Count: 14
Thread: DMC Pearl Cotton Ball B5200 Snow white
Extras: Thread Magic Find Here

It's complete! I started this back in October and had hoped it would be finished by Christmas, oops! But life has a tendency to get in the way, nonetheless it was so worth the wait and time to reach the finished result. The photo's really don't do it justice at how beautiful it is.
I found this pattern by Lord Libidan within the first Issue of Xstitch magazine. Xstitch is a magazine geared towards modern cross stitch patterns and as soon as I saw this pattern I just had to make it. I'm a bit of a lover of anything related to space and I knew this would look amazing framed.
I used DMC Charles Craft Aida in Navy Blue as my material and its beautiful to stitch with. It's hard to show its true colour in photos but its a lovely deep rich colour. Although I did find as time went by the edges started to fray, but this was easily fixed by cutting the edges with pinking shears.

This cross stitch only required one colour and I decided to use DMC Pearl Cotton Ball B5200 Snow white, instead of the normal DMC Cotton embroidery threads. I have to say I found this far easier to stitch with. The strand from a ball is the equivalent of two strands of embroidery thread. It was so lovely not having to separate threads and I found the thread didn't knot or tangle like I sometimes find with standard embroidery threads.
And that moves me onto using magic thread. I had read a little about this in a few places and was keen to give it a go. As much as I love this project it'll be finding a new home with a friend and so I wanted to make sure it would last the test of time.
Magic thread is basically a conditioner. It's designed to make thread more manageable. It reduces thread tangling and friction through material. It's also said to protect your finished cross stitch against UV rays, mold and mildew. It's a clear gel, so suitable for any colour thread, inside a pot with grooves which allow you to run the thread through the gel. I was a little worried it would leave a sticky residue but it doesn't. I would definitely recommend it as it made a huge difference in how easily the thread ran through the material. I've added the link at the top of the post as to where to buy it.

And that's it! I really enjoyed this little project even if it did take far longer than expected to complete. I'm chuffed with how it looks and can't wait to see it framed.


My obsession with Pinterest has meant I have seen hundreds of amazing
sewing projects created by sewing half triangles from quilts, cushions,
bags the list goes on. Naturally I had that moment of “well it can’t be
too hard!” and although it is easy I learnt the hard way!
The first few attempts I had sewing half triangles a few years ago I individually cut
each triangle. Which took FOREVER! Not only that but lining
everything up became harder. Meaning creating a block square by square
seemed an awful lot of hard work and effort.
But when you make them the easy way its amazing the patterns you can make quickly with just a simple triangle. At the moment I'm loving this star pattern but you can really have fun playing around with patterns and prints. Anyway I'll stop waffling now and lets get going!


So here it is: How to sew half triangles (the easy way!)
Firstly cut your fabric into squares. Now the size you cut them will
all depend on how large you want them for the particular project you are
doing. This technique works no matter the size you choose. For this
demonstration I cut my fabric into four inch squares.

Place two squares together, so that they are right sides together (or
print on print). At this point I like to press the squares as it helps
keep everything flat and lined up more easily.
Remember to press and NOT iron. If you run your iron over it several times instead of pressing, it can stretch the fabric.

Pin the squares together making sure everything stays lined up.
Draw a diagonal line using a ruler from one corner to the other using
a fabric pen or pencil. Here I used a dressmakers pencil by Hemline in
blue.

Now it’s time to sew! You need to sew using a straight stitch on both
sides of the line, making sure you sew the same distance from the line.
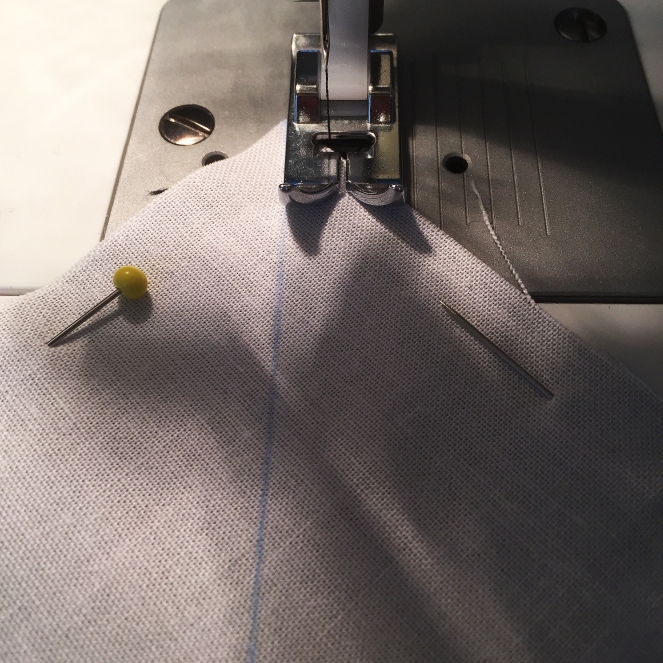
So you should end up with something like this….

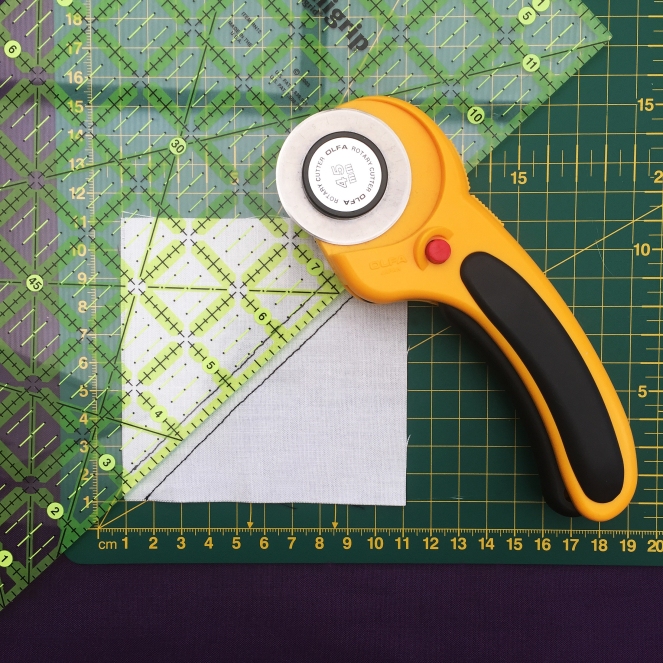
Now remove the pins and cut along the pencil or pen mark that you
drew. I find using a rotary cutter and quilting ruler the easiest way to
do this.

Open each piece of fabric and press the seams to one side.
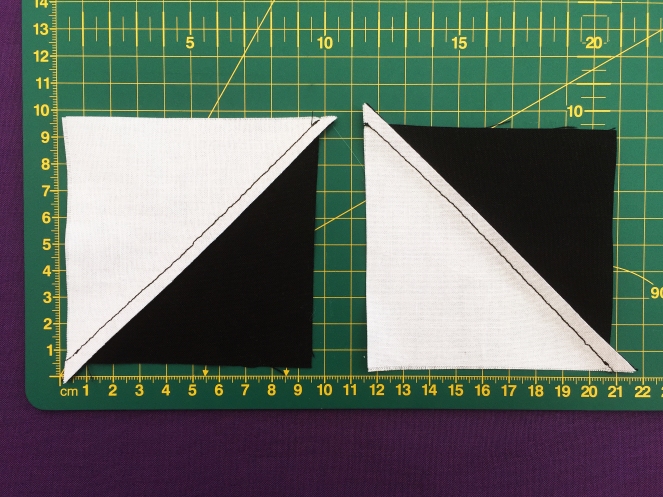
Cut the tips that over hang the square and that is it! Two squares made
in one go, far easier than cutting the triangles out individually!

From using this technique you can create all sorts of patterns and
designs. When you pick a design you would make all the individual
squares before laying them out in your desired pattern. Once arranged
sew each square together row by row.
I hope you all found this little tutorial useful. I would love to
hear any feedback you may have or answer any questions. If there is
anything you would like to see a tutorial on please let me know in the
comments below.


Social Icons