
It was a bit of a trek from Plymouth to Manchester for one night but it was so worth it. I was so excited about this trip and jumped at the chance to go, even if it was a slight mission cramming my sewing machine into a suitcase! Once I had arrived it was made even better by the fact the group I was with were all so lovely and talented.
We met the head designer Victoria Cowley who kindly gave us a group tour of the building. Fabric envy levels were high! Everywhere you turned there were endless towers of bolts of fabric. It's safe to say I think we were all after a meter of everything there! I had seen many of the prints before, however, for some reason, it was almost like I was seeing them for the first time all over again. Being able to see the full collections together in the flesh and on such a scale made me appreciate just how beautiful the fabric they create is.
There were 11 of us in the group, all bouncing with excitement, much to the amusement of all the staff! I believe it was the first time they had ever hosted a tour and workshop. Everyone we met was so lovely, welcoming and answered any questions we had.

For those who don't know Sarah is a freelance Quilting Teacher, author, designer and demonstrator for US & UK TV Shopping Channels. She was lovely, approachable and put those that were a little nervous at ease.
For this workshop, she taught us how to make an applique cushion. Teaching us different techniques along with a fancy iron that became the talking point of the day!

Yes, even the iron we were using was amazing! It was an Oliso Smart Iron that automatically lifts and lowers with your touch. I've never seen one before but they are apparently big in America. Even the staff at Visage all came over to check it out!
All in all, it was a great day, meeting lovely people, learning new skills and of course I walked away with some fabric. A whole bolt in fact! I certainly had a few looks on the train home but I was never going to walk away empty-handed! I picked up this beauty, now I just have to work out what to make with all 15 meters of it!

See below the links to those mentioned in this post. Visage fabrics are a trade supplier but you can pick up their beautiful fabrics in your local Hobbycraft store.
The Craft Cotton co.
Hobbycraft
Sarah Payne

Once you've mastered the basic construction the possibilities to customise them are endless! To making patchwork versions, quilted, using waterproof linings or block fabrics. They are perfect for trying new techniques without using too much fabric and ultimately building confidence.
Each pupil in the class had a little instruction booklet so they could all follow along at their own pace and take away after the workshop.
Zips can be a little daunting for beginners, but they are simple when you take it one step at a time. And there's the added option of adding tabs at each end like you see on the pouch below.

For this workshop, I pre-cut the pieces and made little kits for the pupils to choose from. If there's anything I've learned from sewing it's that the tracing and cutting is the most time-consuming part!
This meant everyone who attended was able to get straight into sewing, take their time and most importantly enjoy sewing it all together.


And here are the finished pouches! Three people attended including one guy which was lovely to see. They all did so well and the final pouches all looked great. The look of achievement when it all comes together never gets old!


Although I plan to teach a whole range of crafts, primarily I'll be teaching sewing. There are so many people out there who buy sewing machines and end up being too frightened to get them out of the box, which is such a shame!
I've always been a believer in starting basic and building up skills. So I decided the first workshop I would run would be How to Sew Bunting.
So I set the date of 18th August, opened up for bookings and was so happy to see the amount of interest. I've helped countless people set up their new sewing machines over the last 5 years and couldn't wait to start making actual projects.
I want to make it as easy for people as possible. I know from experience how frustrating it is walking away from a workshop and forgetting half of what was said! So I have made a little step by step instruction booklet and templates for people to take away for each of my workshops.

I had a group of six people and it was lovely to see everyone getting stuck in! The fabrics and colour combinations people chose were beautiful. I always love seeing the choices people make as it's all inspiration for future projects.
And perhaps best of all three young girls attended and it's great to see youngsters getting crafty and learning new skills.


After two hours we had four lots of bunting all sewn up. Everyone loved it and I can't wait for the next workshops!

Project Details
Design Size: 8x11 Inches
Material Used: DMC Charles Craft Aida Navy Blue Find Here
Count: 14
Thread: DMC Pearl Cotton Ball B5200 Snow white
Extras: Thread Magic Find Here

It's complete! I started this back in October and had hoped it would be finished by Christmas, oops! But life has a tendency to get in the way, nonetheless it was so worth the wait and time to reach the finished result. The photo's really don't do it justice at how beautiful it is.
I found this pattern by Lord Libidan within the first Issue of Xstitch magazine. Xstitch is a magazine geared towards modern cross stitch patterns and as soon as I saw this pattern I just had to make it. I'm a bit of a lover of anything related to space and I knew this would look amazing framed.
I used DMC Charles Craft Aida in Navy Blue as my material and its beautiful to stitch with. It's hard to show its true colour in photos but its a lovely deep rich colour. Although I did find as time went by the edges started to fray, but this was easily fixed by cutting the edges with pinking shears.

This cross stitch only required one colour and I decided to use DMC Pearl Cotton Ball B5200 Snow white, instead of the normal DMC Cotton embroidery threads. I have to say I found this far easier to stitch with. The strand from a ball is the equivalent of two strands of embroidery thread. It was so lovely not having to separate threads and I found the thread didn't knot or tangle like I sometimes find with standard embroidery threads.
And that moves me onto using magic thread. I had read a little about this in a few places and was keen to give it a go. As much as I love this project it'll be finding a new home with a friend and so I wanted to make sure it would last the test of time.
Magic thread is basically a conditioner. It's designed to make thread more manageable. It reduces thread tangling and friction through material. It's also said to protect your finished cross stitch against UV rays, mold and mildew. It's a clear gel, so suitable for any colour thread, inside a pot with grooves which allow you to run the thread through the gel. I was a little worried it would leave a sticky residue but it doesn't. I would definitely recommend it as it made a huge difference in how easily the thread ran through the material. I've added the link at the top of the post as to where to buy it.

And that's it! I really enjoyed this little project even if it did take far longer than expected to complete. I'm chuffed with how it looks and can't wait to see it framed.


My obsession with Pinterest has meant I have seen hundreds of amazing
sewing projects created by sewing half triangles from quilts, cushions,
bags the list goes on. Naturally I had that moment of “well it can’t be
too hard!” and although it is easy I learnt the hard way!
The first few attempts I had sewing half triangles a few years ago I individually cut
each triangle. Which took FOREVER! Not only that but lining
everything up became harder. Meaning creating a block square by square
seemed an awful lot of hard work and effort.
But when you make them the easy way its amazing the patterns you can make quickly with just a simple triangle. At the moment I'm loving this star pattern but you can really have fun playing around with patterns and prints. Anyway I'll stop waffling now and lets get going!


So here it is: How to sew half triangles (the easy way!)
Firstly cut your fabric into squares. Now the size you cut them will
all depend on how large you want them for the particular project you are
doing. This technique works no matter the size you choose. For this
demonstration I cut my fabric into four inch squares.

Place two squares together, so that they are right sides together (or
print on print). At this point I like to press the squares as it helps
keep everything flat and lined up more easily.
Remember to press and NOT iron. If you run your iron over it several times instead of pressing, it can stretch the fabric.

Pin the squares together making sure everything stays lined up.
Draw a diagonal line using a ruler from one corner to the other using
a fabric pen or pencil. Here I used a dressmakers pencil by Hemline in
blue.

Now it’s time to sew! You need to sew using a straight stitch on both
sides of the line, making sure you sew the same distance from the line.
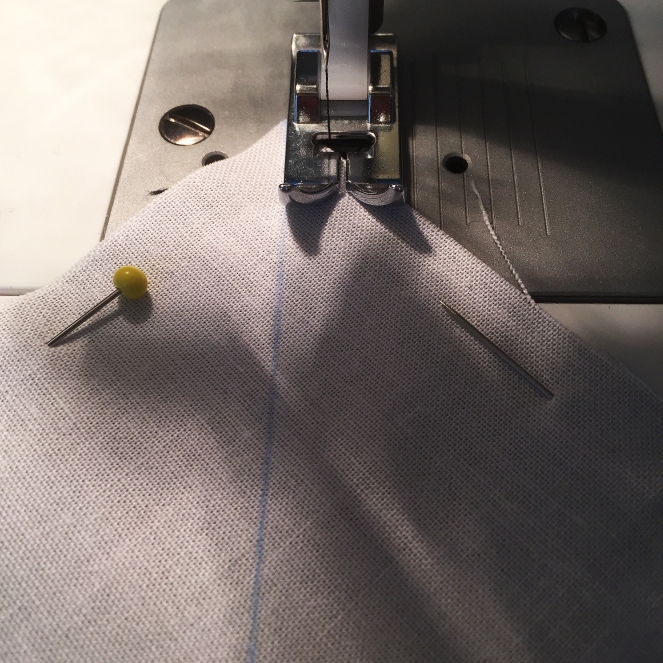
So you should end up with something like this….

Now remove the pins and cut along the pencil or pen mark that you
drew. I find using a rotary cutter and quilting ruler the easiest way to
do this.
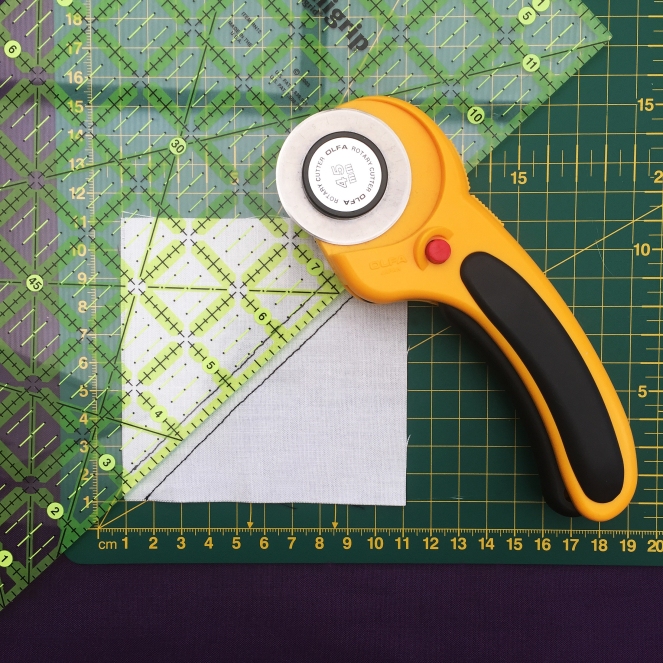

Open each piece of fabric and press the seams to one side.
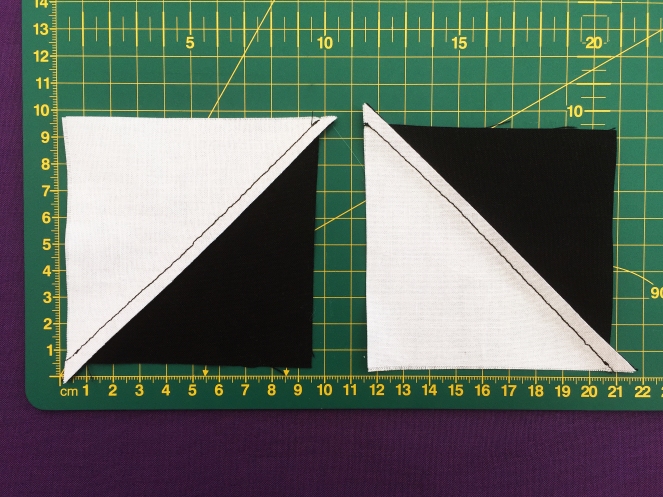
Cut the tips that over hang the square and that is it! Two squares made
in one go, far easier than cutting the triangles out individually!

From using this technique you can create all sorts of patterns and
designs. When you pick a design you would make all the individual
squares before laying them out in your desired pattern. Once arranged
sew each square together row by row.
I hope you all found this little tutorial useful. I would love to
hear any feedback you may have or answer any questions. If there is
anything you would like to see a tutorial on please let me know in the
comments below.

I thought it would be a good idea to show my sewing machine set up, so you can see what I use.
I dabble in all sorts of crafts but for some reason sewing seemed to have passed me by, having never really done textiles at school. So five years ago I decided to take the plunge and buy my first sewing machine, it was a tad scary at the time but I haven’t looked back!
So here it is, my machine is a Singer Simple 3232. I’m not going to lie, the fact it had lilac on it did draw me to it (typical girly way of choosing I know!).
It’s very easy to use and cost me around £150. There are some great machines that are cheaper than this one (around £80-£100), but at the time I decided to spend a little extra and go for a machine that I could “grow” into, rather than something too basic.
This is the perfect sewing machine for beginners. It does everything that I need it to – straight stitch, zig zag, button holes and comes with a zipper foot – and that is really all you need to get going. Singer is a trusted brand and I loved that I could purchase the extra feet and accessories in my local craft shop.
It may not be all singing and dancing, but for anyone just starting out with sewing there is no need to spend a fortune. Keep it simple and honestly you cannot go wrong.
I've never had any problems with this machine and I'm sure one day I'll upgrade to something more snazzy!
xx

Social Icons